Showing posts with label paper. Show all posts

Jan 21, 2013

Orgami Ring for Valentines Day


first image


 Start with one piece of origami 

paper.
Place it color-side down.
Fold in half, then unfold.


Turn and repeat. You should now 

have a "+" in your paper.


Fold each side to the center. It will 

look like doors being closed.
Unfold. Your piece should look like 


Take the edge and fold it to the 

first fold you made before 
Do the same with the opposite 

edge 


Fold one edge over to the second 

crease from the opposite edge 


Repeat with the opposite egde.
The outcome will be the paper 

being divided equally.


With the colored side up, fold back 

the top segment 


Fold the top left point to the center 

of the paper, similar to an airplane 
Thumb Image 2
fold 
Repeat on the other side 


Turn over 
You are going to fold down on the 

line shown 
Fold down 


Turn over
Fold point back
Repeat on other side 


Unfold both sides 
Now you are going to open and 

fold. Pull open the folded piece and Thumb Image 2

push upwards 
Repeat on both sides 


Fold point down toward center 


Repeat on both sides 


Fold up bottom fold 
Fold up again .
One last time .


Turn over 
Now you are going to make it into 

a ring. The small tab is where you 

will insert the other end of paper 

I find this part to be a challenge. 

Just keep rolling and working the 

paper until it looks like standard image 1
You've done it!


thank-you to


Jul 14, 2012

Can You Say Penny....less?


Remember the Whirlybird..............


What You will need:


Paper
Scissors
Paperclip (optional)

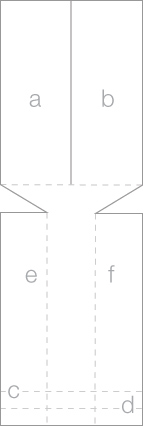
1. Print out this template at the bottom of the page, on to an A4 sheet of paper.

2. Cut along the solid grey lines.

3. Fold flap A forward and flap B back

4. Fold lines C & D upwards – this adds weight to the base of the tail

5. Fold flaps E & F inwards along dotted lines

6. Hold the whirlybird by the tail, high above your head and let go.

7. If you change the length of the wings you can make the whirlybird go faster or slower. You can also add a

paper clip to the tail to give it more weight.

Scrapbook Paper works well adding Individuality to your Whirlybirds!


 Paper toys: Whirlybird

Jun 27, 2012

Happy Holiday, Happy Holiday! What Holiday You Ask?

SERENA MARIE DAY!

Yes that's right Fresno Today's the Day she Returns!


that's right we cant wait!!!!


Serena
Serena mom
so smart!
and tall!
beautiful!
LOVED!!
Well she arrived plane in at 332   we didn't see her until after 4;15

went for a dip then out to dinner with her dad  Drea went to spend the night with her,


How Wonderful she looks Healthy,Happy,Heck of Bigger

Her Hair, O.M.G.!  shes Calmer  like inside, Mature!

GOD  BLESS  GRANDMA SHE DID GOOD!

Jun 13, 2012

Wind-up-Paper-Butterflies

medium
instructions


Materials: You’ll need heavy cardstock, 24 gauge wire, silicone rubber bands (I found mine in the hair aisle at Walgreens) needle-nose pliers, scissors, tape, a paintbrush, a black marker, and a white ink pen.
medium

Step 1: Measure and cut your wire. The wire used for the top wings will be 4 inches, and the wire used for the bottom wings will be 5.5 inches.

Step 2: Find the center of the longer wire. Wrap it around the base of your paintbrush to form a loop.
Step 3: Keeping the loop horizontal, bend the tails of the wire down vertically.
Step 4: Bend each tail in towards each other to form a hook to hold the rubber band.

Step 5: Find the center of the shorter wire, and wrap it around the base of the paintbrush. Instead of forming a loop, pinch the wire to form a circle, and bend the tails of the wire out to form the base for the wings.
Steps 6 & 7: Assemble the body of the butterfly. Wrap the rubber band around the top wire and set it in the center. Thread the rubber band through the loop of
the bottom wire, and attach it onto the bottom hooks.

Step 8: Draw the shape of your wings and cut them out. You can make them as plain or fancy as you want. They don’t have to be perfect—be creative!
Step 9: Outline the edges of each wing with your black marker. Draw lines and doodles on the wings to replicate a Monarch.
Step 10: Use the white ink pen to draw dots on the outer edges of each wing
medium

Step 11: Tape each wing to the body of the butterfly.
Step 12: Holding the body of the butterfly with one hand, use your forefinger to turn the top wings and wind up the rubber band. I found that between 40-50 rotations made the wire nice and tight. Be careful not to wind too far, or the wire might bend!
Step 13: Carefully insert the wound-up butterfly into a card or book. Whoever opens it will get a flutterly little surprise!


Mar 16, 2011

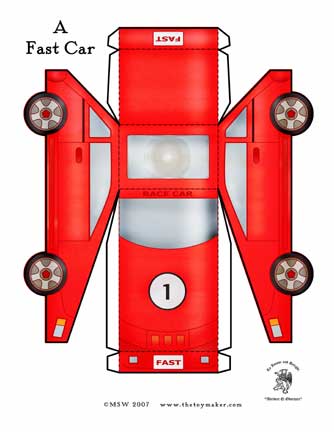
The Toy Maker

I HIGHLY RECOMMEND THIS SITE TO ALL
red race car


 esp if you have children of any age!  AYDEN comes to mind for this race car.

lots of toys to make even some that move!