Showing posts with label cheap. Show all posts

Jul 2, 2013

Silverware Wind Chime!


THINGS YOU
NEED


1. Rag or old cloth
2. Hammer
3. Something to hang the silverware from- we used these chubby little twigs.
4. Scissors
5. Silver or silver plated utensils (they sound nice)
6. Fishing line
7. Beads to embellish the hanging silverware
8. Drill bit
9. Drill
10. Safety goggles


Pound the silverware flat. Placing the old towel over the silverware kept the surface smoother. And then we finished them up bare.
Be sure to hold the utensils still by their handles while pounding the curved parts.


Don’t bother flattening the handle of the knives. We tried and found that ours were hollow and ruined one. Oops!


Prep the hanging sticks and drill the holes in the silverware.


When drilling the holes through the twig, place them pretty close together. We made them about an inch apart, and it takes a pretty stiff wind to make them jingle. Maybe try 3/4? or so.


Drill the holes in the silverware. This is the hardest part. Hold the utensil firmly on the table covered with the cloth (it will get hot!) with only a small overhang. Drill carefully through the handle near the tip. Wear safety goggles to protect yourself from little metal shavings!


Cut lengths of fishing line and thread them through the holes in the twig. Wrap the line around a time or two and tie multiple knots to assure they won’t come loose.

I left pieces of the line on the outermost holes on the top side to form a loop from which to hang the wind chime.

Plan and string your beads and silverware.

It’s a little tricky to thread and tie knots in the fishing line. Be sure to wrap the line through the silverware holes a couple of times and tie multiple knots. Trim left over line fairly close to the knot.

Be sure to keep your silverware hanging at similar lengths so they’ll all be able to clink into each other in the wind.


Tie the two lengths of line at the top to form a triangle/loop to hang the chime from. We added a few more beads up there too, just to make them look prettier but they would hang nicely from a simple loop tied in the fishing line too.


Thank you for reading We are Family Becerra...Hunt....Trevino

Dec 28, 2012

New Years Eve Crafting


Hanging Clocks

What You'll Need
Construction paper
Hot glue gun
Tape
X-acto knife/scissors
Fishing wire

How To Make It
1. Cut construction paper into long strips that are half as wide as the circles you want to hang.
2. Accordion fold the strips, trying to keep the folds as even as possible.
3. Adhere two or more strips together using tape until you can form a circle.
4. Hot glue gun the center of the circle to keep the shape.
5. Cut 3, 6, 9, 12 and clock hands out of card stock.
6. Attach the embellishments with tape or hot glue.
7. Hang with clear fishing wire.

Cork Countdown

What You'll Need
Craft knife
Card stock
Star hand-puncher (or different shape)
Scissors

How To Make It
1. Cut a slit in the top of a cork.
2. Cut the numbers 1-10 out of colorful card stock.
3. Punch the numbers with a star hand-puncher and then stick them in the cork slits.

Dec 10, 2012

Christmas Decor for Families on a Budget


Glass Bottles, Primer, Epsom Salt 


Gather up old wine bottles at a yard sale or second hand store or even friends and neighbors, get the primer from the garage or local store the salt if you do not have any Dollar Store carries it.

Now lay out some paper or a tarp, an old shower curtain  .Your going to spray the clean dry bottles with the primer then roll in the salt!

Easy, Simple, Cheap, Elegant!


Jul 14, 2012

Fun Cheap Boredom Busters.................

Eggshell Salt Geodes
Materials:
Epsom salt
Hot water
Food coloring
Eggshells

Eggshell geodes 2
Begin by taking eggshells that have been broken at the middle and trimming them slightly with a pair of sharp scissors or a serrated knife to get a fairly even edge along the top.

Eggshell geodes 3

Arrange your eggshells in an egg carton so that they have a place to sit upright when filled.

Snowflake 5
Make the salt solution by mixing Epsom salt into hot water until the water cannot hold any more salt.  In other words, you will pour salt into the water (we used about a cup and a half of water, but you could easily get by with much less), mixing well with a whisk until you see that the salt is no longer able to dissolve into the water and a slurry begins to form.  At this point, you can add a bit of food coloring as well.

Eggshell geodes 5

Fill the eggshells with the salt solution.  You can then set them aside to dry.  This will take some number of days, depending on the humidity level in your house.  As they dry, salt crystals will begin to form inside the shells, giving them an appearance similar to a geode.  As an alternative, you can also put the eggshells into the refrigerator for a few hours and from what I hear, crystals will form this way as well.  Nearly instant gratification! We haven't tried this method at our house yet, but I'm pretty sure that it is what Tiffany did with hers, and they seemed to have turned out well.


Eggshell geodes 6 
Add caption


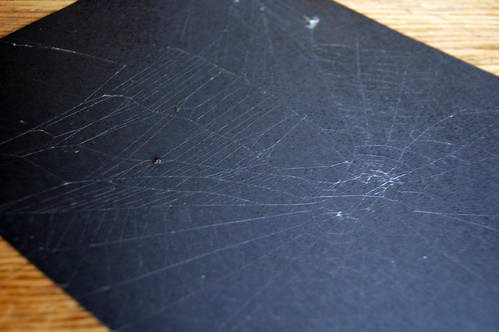
How To Catch A Spider's Web
Supplies:
Black construction paper (or black cardstock)
Spray adhesive
White spray paint (optional)
Scissors
Directions:
1.  Locate a clean spider's web (preferrably one in which the spider has vacated)
2.  Spray the black paper with spray adhesive
3.  Spray the spider's web from each angle with white spray paint, careful not to get any spray on nearby leaves, fence, etc.  This may require the use of some newspaper as a dropcloth.
4.  With the black paper behind the web, slowly bring the paper towards you until it touches the web.  Then with the web on the paper, carefully cut the guy lines holding the web in place.
5.  Document with chalk or pencil on the back of the paper the date and where the web was collected. 
spiderweb captured
Charlotte, our friendly summer spider wondered what we were doing!


paper doll for Birthday Party

Card-BirthdayPaperDoll.gif - 133178 Bytes


 Save Time DO an eye exam at home

PRINT OUT

BADGES


PRINT MONEY


use the web your mind or my BLOG!

Jun 13, 2012

Wind-up-Paper-Butterflies

medium
instructions


Materials: You’ll need heavy cardstock, 24 gauge wire, silicone rubber bands (I found mine in the hair aisle at Walgreens) needle-nose pliers, scissors, tape, a paintbrush, a black marker, and a white ink pen.
medium

Step 1: Measure and cut your wire. The wire used for the top wings will be 4 inches, and the wire used for the bottom wings will be 5.5 inches.

Step 2: Find the center of the longer wire. Wrap it around the base of your paintbrush to form a loop.
Step 3: Keeping the loop horizontal, bend the tails of the wire down vertically.
Step 4: Bend each tail in towards each other to form a hook to hold the rubber band.

Step 5: Find the center of the shorter wire, and wrap it around the base of the paintbrush. Instead of forming a loop, pinch the wire to form a circle, and bend the tails of the wire out to form the base for the wings.
Steps 6 & 7: Assemble the body of the butterfly. Wrap the rubber band around the top wire and set it in the center. Thread the rubber band through the loop of
the bottom wire, and attach it onto the bottom hooks.

Step 8: Draw the shape of your wings and cut them out. You can make them as plain or fancy as you want. They don’t have to be perfect—be creative!
Step 9: Outline the edges of each wing with your black marker. Draw lines and doodles on the wings to replicate a Monarch.
Step 10: Use the white ink pen to draw dots on the outer edges of each wing
medium

Step 11: Tape each wing to the body of the butterfly.
Step 12: Holding the body of the butterfly with one hand, use your forefinger to turn the top wings and wind up the rubber band. I found that between 40-50 rotations made the wire nice and tight. Be careful not to wind too far, or the wire might bend!
Step 13: Carefully insert the wound-up butterfly into a card or book. Whoever opens it will get a flutterly little surprise!